Message Center provides an additional layer of security to your account with its multi-step verification feature. Phone Number (SMS), Google Authenticator, Email or APP are used as multi-step verification tools .
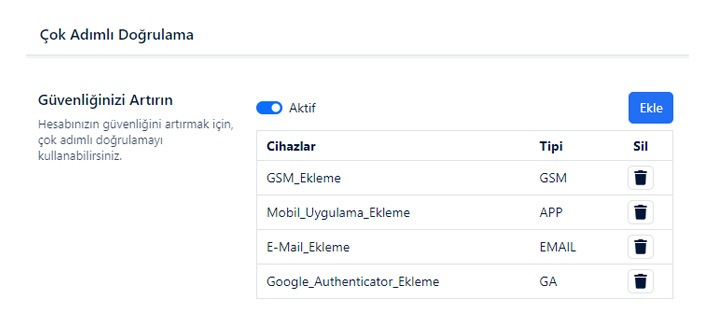
In order to use the devices added to the Multi-Step Verification devices section, the devices must be activated. Activate the button as shown in the image.
Verification Procedures via SMS
- Click on the Settings ( ) icon in the upper right corner
 and switch to the settings tab.
 - On the page that opens, click on the Multi-Step Verification tab from the Settings list.
- In the Multi-Step Verification Tab:
- Click the Add button to open the Add Device window.
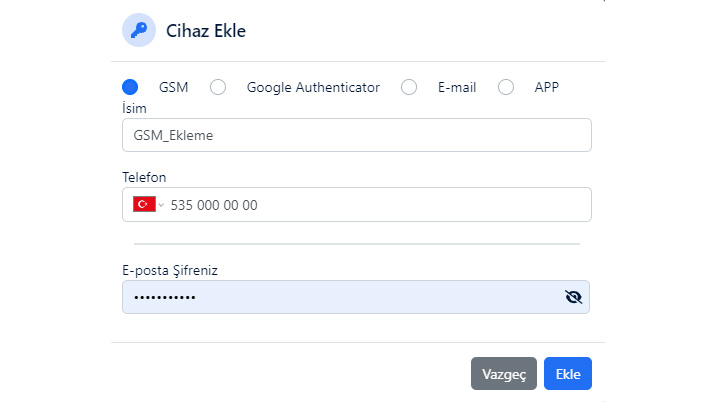
- Select the GSM option from the window that opens and enter a name for the multi-step verification device to be created.
- In the Phone Number section, enter the mobile phone number that will be used for verification. Please make sure that the number is correct. An SMS verification code will be sent to this number during user login.
- Enter your e-mail account password in the password section.
- Click the Add button to complete the process of adding Multi-Step Verification .
- You can view the devices you have added on the Multi-Step Verification page.
Verification Processes with Google Authenticator
- Click on the Settings ( ) icon in the upper right corner
 and switch to the settings tab.
 - On the page that opens, click on the Multi-Step Verification tab from the Settings list.
- In the Multi-Step Verification Tab:
- Click the Add button to open the Add Device window.
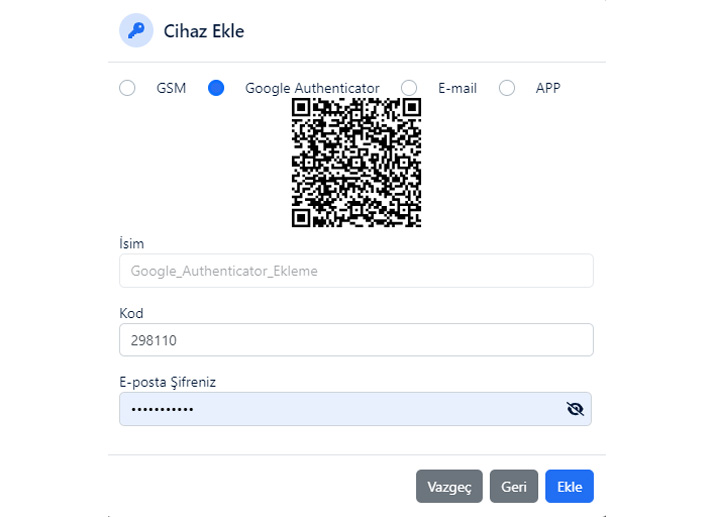
- Select the Google Authenticator option from the window that opens , enter a name for the multi-step verification device to be created, and click the Next button.
- Open the Google Authenticator app on your mobile device and scan the QR code that appears on the screen with your device. After reading, the name you created for Multi-Step Verification will be listed on your mobile device and will start generating codes.
- Write the generated code in the Code section on the relevant window .
- Enter your e-mail account password in the password section.
- Click the Add button to complete the process of adding Multi-Step Verification .
- You can view the devices you have added on the Multi-Step Verification page.
Multifactor Authentication (MFA) is a security measure that requires users to provide more than one form of identification to access an account. MFA makes it harder for unauthorized users to access accounts, even if they steal a password. It’s a simple and effective way to protect accounts from cyberattacks.
Verification Procedures via Email
- Click on the Settings ( ) icon in the upper right corner
 and switch to the settings tab.
 - On the page that opens, click on the Multi-Step Verification tab from the Settings list.
- In the Multi-Step Verification Tab:
- Click the Add button to open the Add Device window.
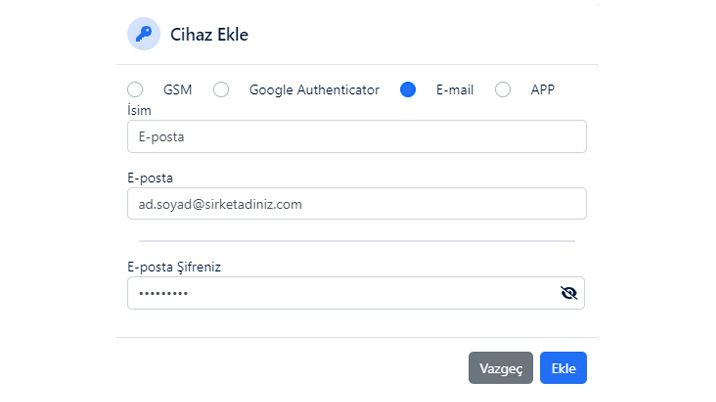
- Select the E-mail option from the window that opens and enter a name for the multi-step verification that will be created.
- In the E-mail section, enter the e-mail address to which the verification code will be sent.
- Enter your e-mail account password in the password section.
- Click the Add button to complete the process of adding Multi-Step Verification .
- You can view the devices you have added on the Multi-Step Verification page.
Verification Procedures with APP
- Click on the Settings ( ) icon in the upper right corner
 and switch to the settings tab.
 - On the page that opens, click on the Multi-Step Verification tab from the Settings list.
- In the Multi-Step Verification Tab:
- Click the Add button to open the Add Device window.
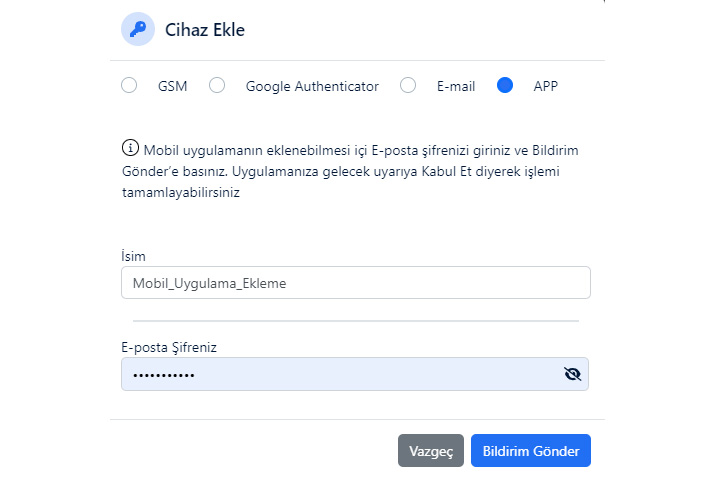
- Select the APP option from the window that opens and enter a name for the multi-step verification to be created.
- Enter your e-mail account password in the password section.
- Click the Add button to complete the process of adding Multi-Step Verification .
- You can view the devices you have added on the Multi-Step Verification page.
Multi-Step Verification Deletion Processes
You can follow the steps below to delete the authorization devices you have added.
- Click on the Settings ( ) icon in the upper right corner
 and switch to the settings tab.
 - On the page that opens, click on the Multi-Step Verification tab from the Settings list.
- In the Multi-Step Verification tab, you can view the devices that have been added.
- Click the Delete ( ) button located next to the Multi-Step Verification device you want to delete
 .
. - In the Delete Device window that opens , enter your email account password.
- Click the Delete button to complete the deletion process .

